
{easter} Colorful Silk-Dyed Eggs
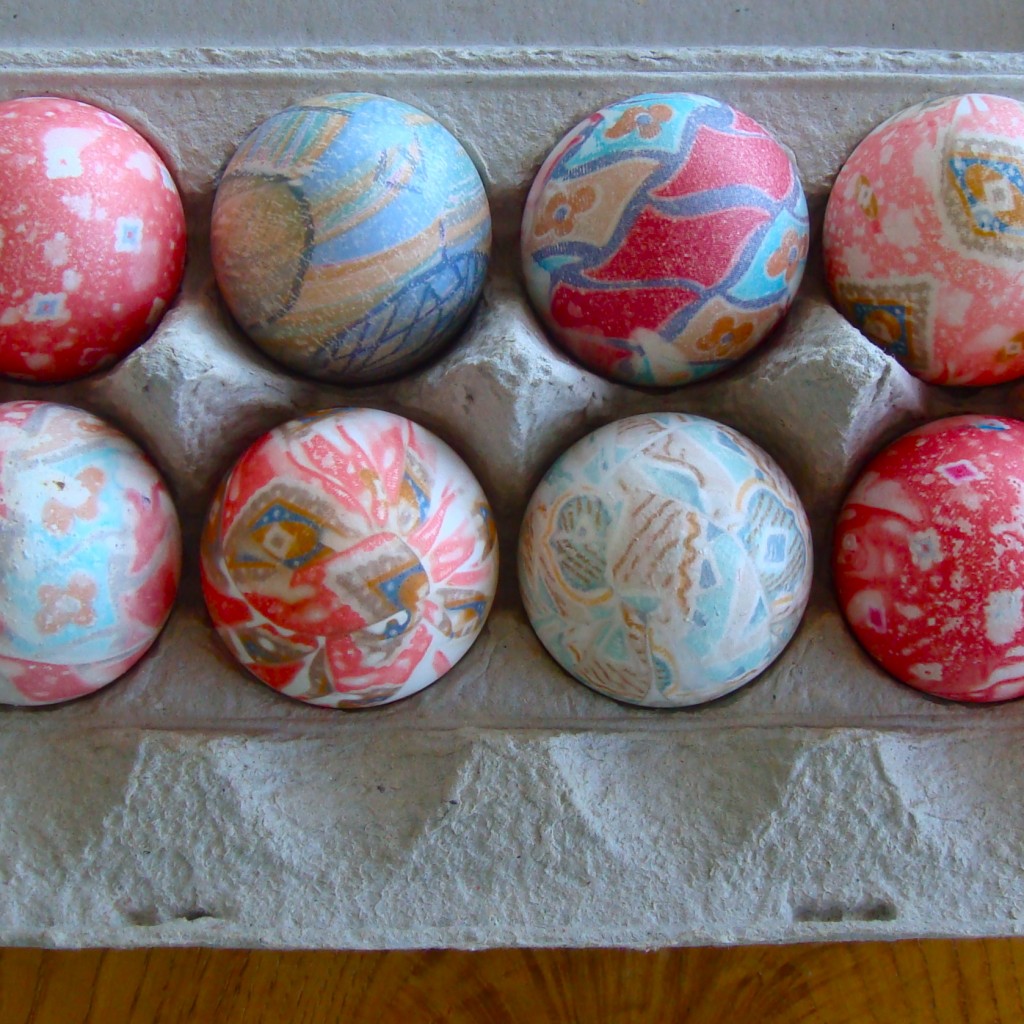
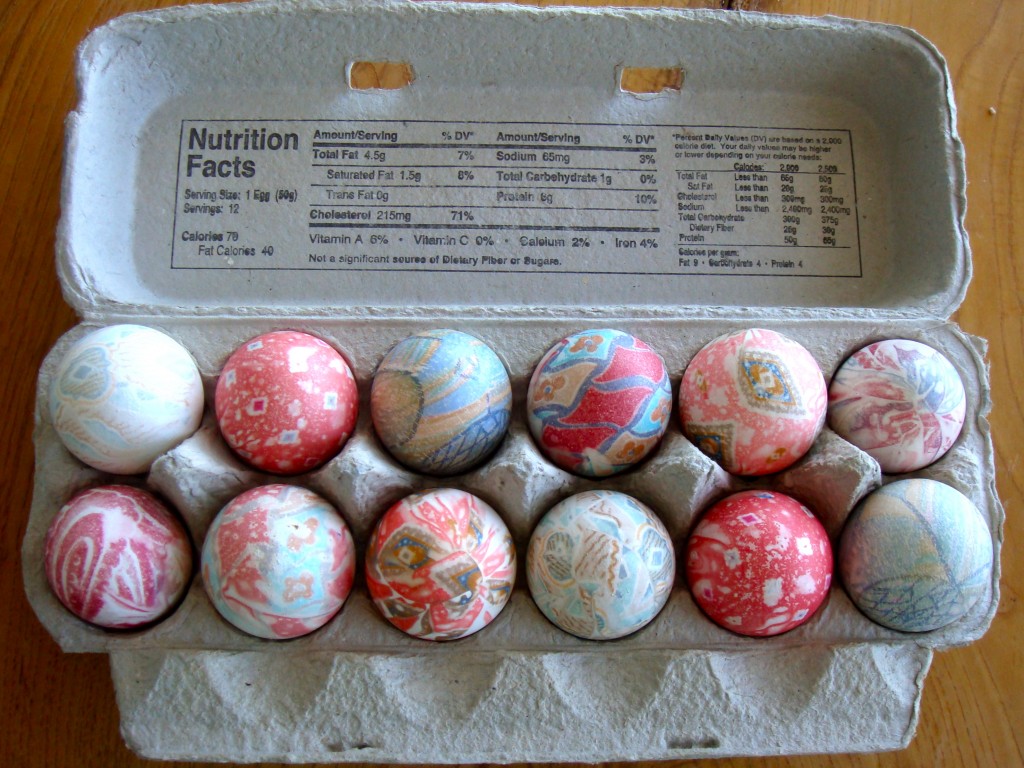
Last Easter I made these pretty marbled pink eggs, but this year I was inspired to try silk-dyed Easter eggs. They turned out more gorgeous than I expected!
They are actually surprisingly easy to make, and pretty hard to screw up.

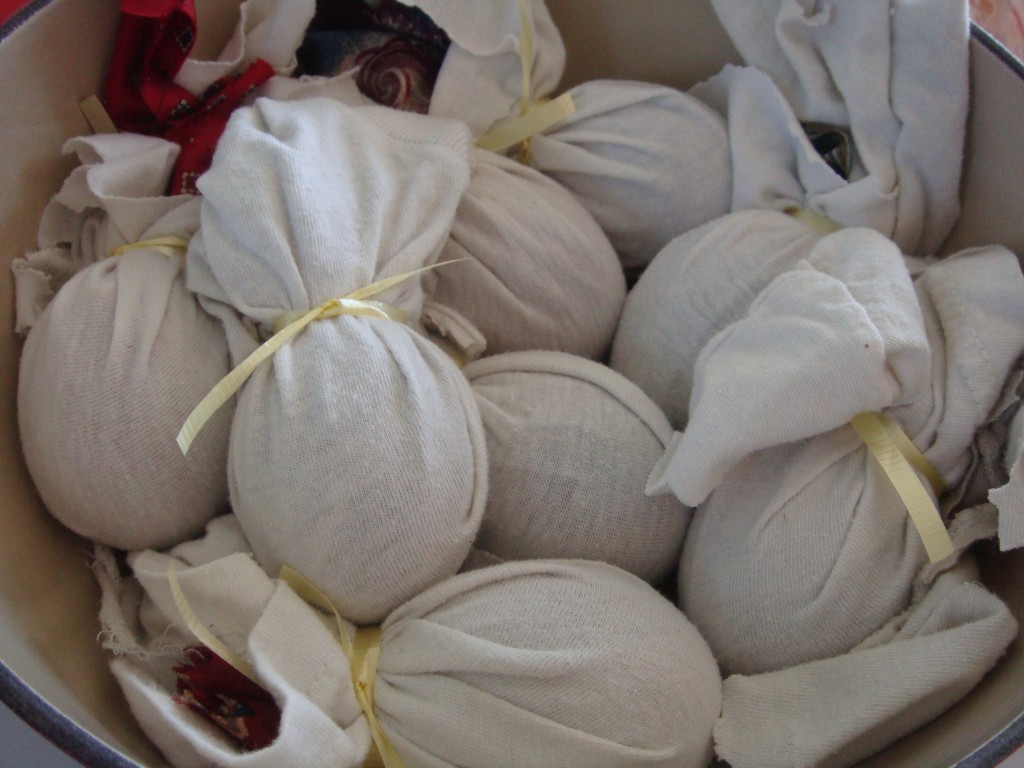
To make them, you wrap eggs in patterned silk (thrift store rejects) and then in plain fabric (I cut up an old t-shirt) then tie them tightly with string. It’s important to get as tight a wrap as possible for good results. They look funny and cute all wrapped up and ready to go!

Here are the ties I used. Some of the colors that came out were surprising. For example, the dark green and tan tie made eggs that had all different shades of light blue, green, and yellow. Overall the vibrant colored ties came out more dramatic, but I like the softer colors as well. Some of the eggs came out with fine-grain patterns that weren’t discernible on the ties, which was neat.

A couple of notes: you must use 100% silk fabric. I used silk neckties I bought from our local thrift store and was able to dye 2 eggs with each necktie. The only downside to the thrift store ties: when you pour out the water at the end, your whole kitchen smells like thrift store for a minute or two. You could also use a tie that had an irreparable stain, or an old silk shirt. I was tempted to buy one of those sandwashed silk shirts that were so popular in the 90s, since there were quite a few to choose from, but I wasn’t sure if washed silk would work, so I stuck with the ties. I was really happy with how they turned out!
How to Make Colorful Silk-Dyed Easter Eggs
- Cut pieces of silk large enough to wrap around an egg.
- Wrap the egg with the silk, printed side touching the egg. Tie tightly with a piece of string.
- Add a piece of white cotton scrap material around the egg. Tie tightly with a piece of string.
- Put eggs in a non-metal pot (glass or enamel, like Le Creuset.) Cover the eggs completely with water and add 3 tablespoons vinegar.
- Bring water to a boil, turn down the heat to low, and simmer for 30-40 minutes.
- Remove eggs from hot water and let cool. Once cool, carefully remove the fabric from the egg and set out to dry on a rack.
A note: because they have to cook so long to let the silk dye come out, they don’t make the best eating eggs… but my uncle Paul usually doesn’t mind them overcooked. Happy Easter!


Gorgeous!!!!
Thanks, Jaden! Means a lot coming from you. 🙂
These are amazing looking. Who knew you could ever do this with old neckties? Martha Stewart would give you an A+ on that. 😉
Thanks Carolyn! 🙂
These are amazing!
@Erin thank you so much!
I wonder if it would be possible to empty the eggs first then put the fabric around and boil? I guess they might float…I might try it anyway!
@Jennifer I was wondering that too. I’m worried they would crack with the long boiling time. If you try it, let us know if it works!!
I love these!!!! Is there a way I can print the instructions from your page?
@joy I’m working on adding a print feature but haven’t done it yet 🙁
Absolutely beautiful. What a novel idea.
@Lana @Natascha thank you so much for your comments!
These are beautiful! I am always looking for new and creative ways to color my eggs, but this is the first time I’ve ever seen this. Thanks!
How cool! I’ve never heard of this technique. They are so beautiful!
But I would not recommend eating eggs dyed like this… they dye in the ties is likely chemical and not food-grade. 🙂
@Dawn good point. They are not good eating for quite a few reasons. 🙂 I guess they could be better used as compost!
Wow these are gorgeous…real works of art!!!
Got here from Jaden’s site and glad I did. Fantastic!
@Diane thanks for stopping by, and thank you for the comment!
Is there a reason that the pot has to be non-metal? Do you think you could hard boil some eggs, cool, wrap them and then put them in a glass bowl that has the boiling water and vinegar in it? (I don’t have a non-metal pot).
Great idea and beautiful results!
@Susan, I think the metal might react with the dye- but I don’t know for sure. The person who showed me how to do this told me non-metal, but I didn’t think to ask why. I don’t know about the boiling water idea- I think it takes a long time for the heat to react with the dye on the silk-hence the 40 minute cook time. If I were you I’d just try a metal pot and see how it works!
These are so much fun to make. Your eggs are turned out lovely.
@Esme thank you so much!
@Karen and Susan, I am guessing that person didn’t want you to use a non-stainless steel pan, and many metal pans have aluminum and various alloys in them. Vinegar reacts with anything with aluminum in it, for instance and would truly interfere with the dye transfer (it is why you are not supposed to cook eggs for “regular” dying in a pan with aluminum or various other metals in them), but stainless steel doesn’t react with vinegar. I am going to try doing this (so excited and got my ties this morning at the Goodwill) and will use a Le Crueset, but some day I will try it in one of my fancy German stainless pans and see how it does. When I do it, I’ll report back.
Thanks for the shout out! We really loved making them!